How to run TensorFlow on NVIDIA GPU (Ubuntu 20.04 - May/2022)
Intro
The use of GPUs is incredibly helpful for many activities related to Machine Learning and Data Science, but correctly setting up your environment to leverage the processing power of these devices can often be a little confusing and time consuming, specially for people new to the field.
The goal of this post is to summarize all necessary steps to run TensorFlow on an NVIDIA GPU from a fresh Ubuntu 20.04 installation in May/2022.
This guide will cover the setup of:
- NVIDIA drivers
- CUDA Toolkit
- CUDNN
- NVIDIA Container Toolkit (optional)
The computer (notebook) used to develop this guide was equipped with an Intel® Core™ i7 CPU and an NVIDIA GeForce MX250 GPU. The following steps may vary slightly depending on your equipment.
1 - NVIDIA drivers installation
To install the latest NVIDIA drivers you will need to:
- Uninstall old drivers
- Retrieve new lists of packages
- Remove unused packages
- Search for latest driver version
- Install latest drivers (510 in the example bellow)
- Reboot
These steps can be done with the following commands:
sudo apt-get purge nvidia-*

sudo apt-get update

sudo apt-get autoremove

apt search nvidia-driver

sudo apt install libnvidia-common-510

sudo apt install libnvidia-gl-510

sudo apt install nvidia-driver-510

sudo reboot
2 - CUDA Toolkit installation
Check the pre-installation steps from the official documentation to make sure you have all necessary prerequisites.
Install Linux headers
sudo apt-get install linux-headers-$(uname -r)Install CUDA Toolkit following the official documentation or running the commands bellow:
 wget https://developer.download.nvidia.com/compute/cuda/repos/ubuntu2004/x86_64/cuda-ubuntu2004.pin

 sudo mv cuda-ubuntu2004.pin /etc/apt/preferences.d/cuda-repository-pin-600

 wget https://developer.download.nvidia.com/compute/cuda/11.7.0/local_installers/cuda-repo-ubuntu2004-11-7-local_11.7.0-515.43.04-1_amd64.deb

 sudo dpkg -i cuda-repo-ubuntu2004-11-7-local_11.7.0-515.43.04-1_amd64.deb

 sudo cp /var/cuda-repo-ubuntu2004-11-7-local/cuda-*-keyring.gpg /usr/share/keyrings/

 sudo apt-get update

 sudo apt-get -y install cuda
Reboot to fix mismatched versions of drivers and libraries if you get the following error when running
nvidia-smiFailed to initialize NVML: Driver/library version mismatch
4 - CUDNN installation
Download cnDNN
- Register for the NVIDIA Developer Program.
- Go to: NVIDIA cuDNN home page.
- Click
Download cuDNN. - Complete the short survey and click Submit.
Install CUDNN following the official documentation or running the commands bellow for version
8.4.0.27:sudo dpkg -i cudnn-local-repo-ubuntu2004-8.4.0.27_1.0-1_amd64.deb sudo apt-key add /var/cudnn-local-repo-ubuntu2004-8.4.0.27/7fa2af80.pub sudo apt-get update sudo apt-get install libcudnn8 sudo apt-get install libcudnn8-dev
5 - NVIDIA Container Toolkit installation
The steps 1-4 are enough to run TensorFlow locally on NVIDIA GPUs, but there are a few extra necessary steps in case you want to use the GPU in a Docker container with NVIDIA Container Toolkit.
Uninstall previous versions of Docker Engine
 sudo apt-get purge docker-ce docker-ce-cli containerd.io docker-compose-plugin

 sudo rm -rf /var/lib/docker

 sudo rm -rf /var/lib/containerd
Install NVIDIA Container Toolkit following the official documentation or running the commands bellow:
 curl https://get.docker.com | sh \
   && sudo systemctl --now enable docker

 distribution=$(. /etc/os-release;echo $ID$VERSION_ID) \
   && curl -fsSL https://nvidia.github.io/libnvidia-container/gpgkey | sudo gpg --dearmor -o /usr/share/keyrings/nvidia-container-toolkit-keyring.gpg \
   && curl -s -L https://nvidia.github.io/libnvidia-container/$distribution/libnvidia-container.list | \
         sed 's#deb https://#deb [signed-by=/usr/share/keyrings/nvidia-container-toolkit-keyring.gpg] https://#g' | \
         sudo tee /etc/apt/sources.list.d/nvidia-container-toolkit.list

 sudo apt-get update

 sudo apt-get install -y nvidia-docker2

 sudo systemctl restart docker
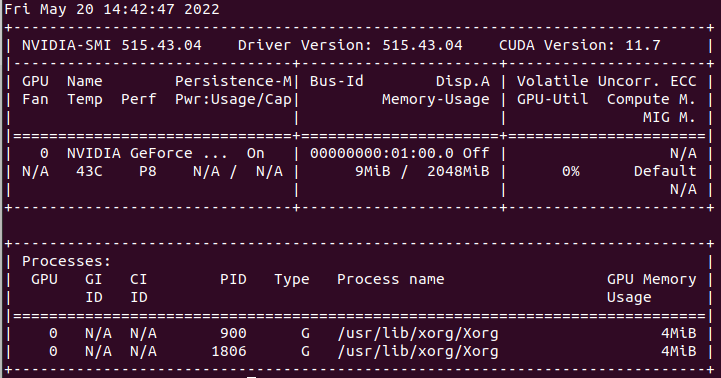
Test the installation with:
sudo docker run --rm --gpus all tensorflow/tensorflow:latest-gpu nvidia-smiThe result should look similar to this:
6 - Bonus: Enabling GPU access with Docker Compose
According to the official Docker documentation, in order to enable GPU access with Docker Compose, the following deploy information should be included to your docker-compose.yml file.
services:
  test:
    image: # your image
    deploy:
      resources:
        reservations:
          devices:
            - driver: nvidia
              count: 1
              capabilities: ["gpu"]
About the author
Machine Learning Engineer
Hardworking, motivated and goal-oriented engineer with 6+ years of programming experience and 2+ years playing significant roles on Machine Learning and Computer Vision projects for clients ranging from small startups up to large international corporations.
Comments
Join the discussionNo comments yet. Be the first to comment.

